
First Things First
Like any self-hosted website, you will need to have a domain name and hosting for your soon-to-be WordPress.org-powered website. If you need a domain name, we recommend purchasing yours at GoDaddy. For hosting, we have two recommendations. For those who want great hosting at a very affordable price; we suggest Hostgator. Monthly plans are all less than $10 and as low as $4 if you go with a longer plan. If price is less of a concern and you want “top-notch” hosting that specializes in WordPress, then we highly recommend WP Engine. (Read our WP Engine Review)
But, my WordPress.com site already has a custom domain.
No problem.
If your WordPress site already has a custom domain name that you purchased through WordPress.com, then don’t worry. We will cover that as well. Lastly, you will need access both your WordPress.com site and your new WordPress.org site, so you can easily move all of your posts, pages, images, comments, and other data over to your self-hosted WordPress.org site.
Now for the step-by-step part of the migration.
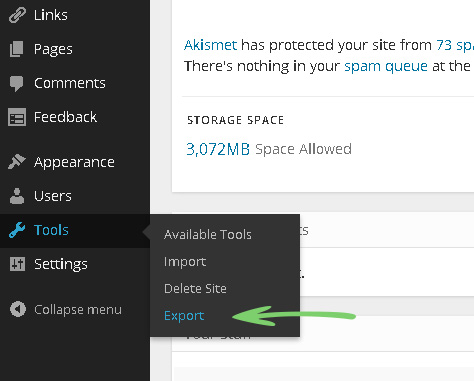
Step 1: Export Your Data from WordPress.com
Sign in to your WordPress.com website and go to your blog’s Dashboard. Navigate to Tools and then click on Export.
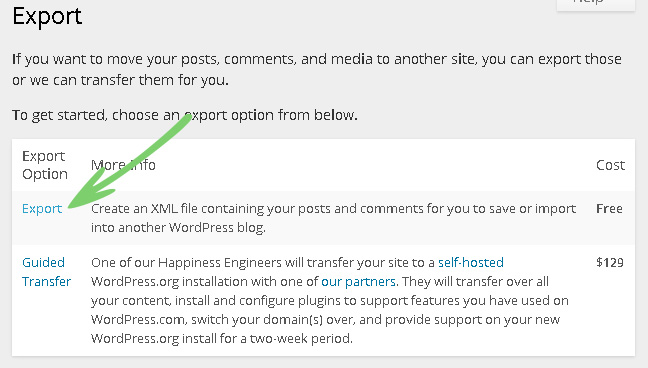
Step 2: Click on the Export option.
Click on the free Export option. Of course you can always fork over $129 to let a “Happiness Engineer” do this for you. Or, if you sign up for our free WordPress installation service we’ll do it for you for ….free!
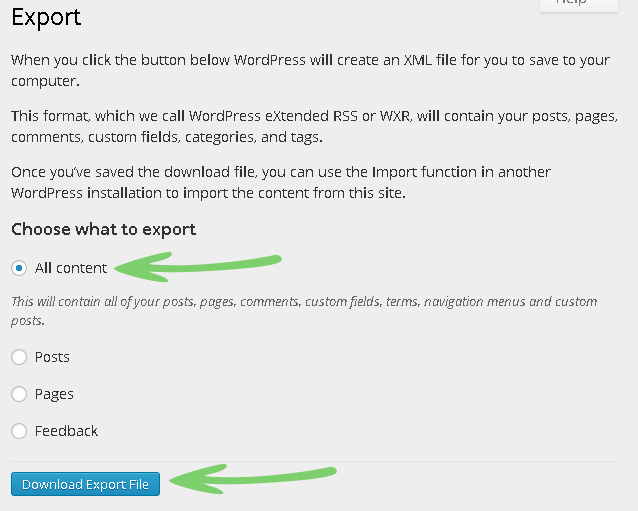
Step 3: Export Everything (posts, pages, comments, etc) – Click the All Content Option.
Remember where you save this file on your computer as you will need to retrieve it for when you import it into your new WordPress.org-powered website.
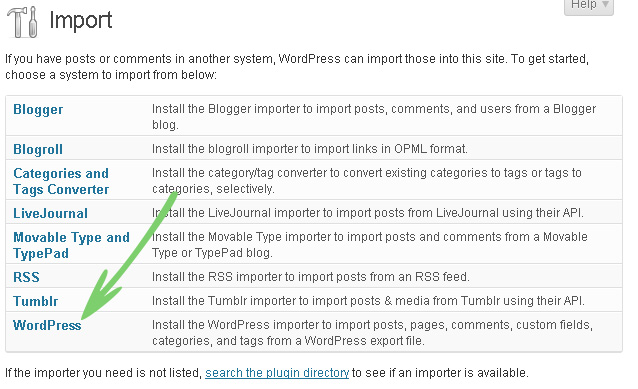
Step 4: Go to the Import section of your WordPress.org site
Go to your WordPress Dashboard, hover over Tools and select Import. This will take you to the Import page.

Step 5: Select the WordPress option
This will take you to the WordPress Importer plugin that you will need to download.
Step 6: Download and activate the WordPress Importer plugin
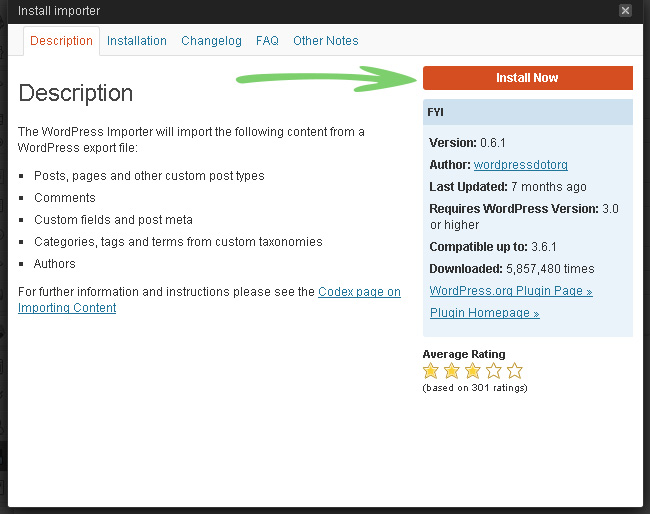
Step 7: Upload the XML file you exported in Step 3 above
After you install and activate the WordPress Importer plugin you will be taken to the page where you can upload the file you exported.
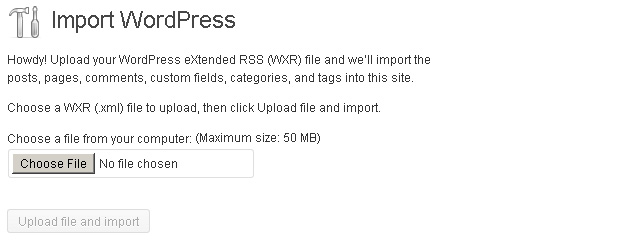
Note: if your file size is larger than 2MB, then you may need to do one of two things. Your hosting company may have a limit on the file size you can import. If this is the case then you can simply ask them to temporarily increase the limit. Your other option is to split the file using a tool like WXR file splitter.
Step 8: Make Sure to Import Your Images.
When you begin to import your file, you will have the option of importing your old attachments…aka your images. You definitely want to make sure this option is checked if you want to import your images. You will have the option of assigning your old content to a current user or create a new user. Once the import is complete, you should have successfully transferred your content from your WordPress.com site to your new WordPress.org site.
But you’re not done just yet.
Step 9 (Optional) : Make your WordPress.com Site Private
This is optional and should only be done if you do not want to redirect your old users to your new WordPress.org site. Put another way, do this if all you want is the content from your WordPress.com site and you have no interest in transferring any SEO value to your new WordPress.org site. Click on Reading under the Settings tab from your WordPress.com Dashboard. Select the option that reads, “I would like my blog to be private, visible only to users I choose”.
Step 10: 301 Redirect Your Old Site (Highly Recommended)
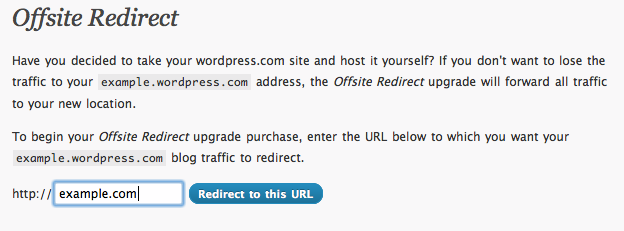
If your WordPress.com site has been around for a while then it has been indexed by the search engines. You may also have a large readership that you want to “follow” you to your new site. To preserve your old sites’ SEO value and transfer it to your new site, you need to 301 redirect your old, WordPress.com site to your new WordPress.org one. Purchasing the Offsite Redirect upgrade will take the traffic coming to your old WordPress.com site and forward it to your new domain so that links to your old content won’t break and you won’t take an SEO hit as a result of your move.
Since you don’t have access to .htaccess on WordPress.com, you cannot complete this step by yourself. Fortunately, WordPress.com offers a paid solution that will perform this 301 redirect. It’s called Offsite Redirect and costs $13 per year (as of October 2013). Purchasing the Offsite Redirect upgrade will take the traffic coming to your old WordPress.com site and forward it to your new WordPress.org-powered site so that links to your old content won’t break and you will preserve any SEO value during this migration.
To purchase the Offsite Redirect, go to your WordPress.com dashboard and hover over the Store tab and click on Store. You will see the Offisite Redirect option. Once you have purchased it you simply need to enter the URL of your new domain and enable it.
Step 11: Clean Up Your Internal Links
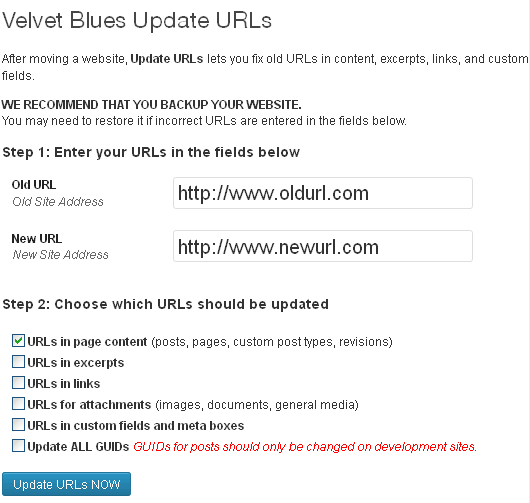
Once you have completed the migration including the 301 redirect, you have just one last thing to do that involves dealing with your internal links. By internal links, I mean any links in blog posts or pages that link to other posts or pages in your site. Essentially, anywhere you had links in your old WordPress.com site that pointed to other posts/pages of your old WordPress.com site. When you go to your WordPres.org site and start looking at your content to make sure it transferred correctly, you will find that the internal links to blog posts, pages and references to images are still pointing to your old WordPress.com site. You need to fix this so that they are linking to your new WordPress.org site. This can easily be done with a free plugin called Velvet Blues Update URLs. This plugin helps you update all the old URLs and links in your new WordPress.org site.
Go to the plugins library from your new WordPress.org site, do a search for ‘Velvet Blues Update URLs’ and install ‘n activate the plugin. Next, go to the Settings tab in your admin panel and select update URLs. This will take you to the screen which will allow you to type in your old website URL and your new website URL. Simply choose which URLs you want updated and hit the Update button. Now your links that were pointing to your old WordPress.com site are now updated to point to the corresponding URL in your new WordPress.org site.
WordPress.com to WordPress.org Migration FAQs
How long do I need to keep redirecting my WordPress.com site for?
It is a good idea to keep this redirect for no less than a year. But at only $13 per year to keep this going, it wouldn’t hurt to keep this redirect in place for 2 years.
Will my images transfer okay or will they break?
They will be okay with one exception. So long as you follow the steps above during the import/export process, your images will be fine. The exception to this occurs if your image URL starts with files.wordpress.com. In this case your images will not be converted. If you notice your image URLs have not changed (they still point to WordPress.com), then use the Import External Images plugin. This will solve the issue.
Do I still need hosting if I purchased my domain from WordPress.com?
If you want to stay on WordPress.com then you don’t need hosting as it is provided by WordPress.com. However, if you want to move your site to WordPress.org then you do need to get your own hosting.
I purchased a custom domain through WordPress.com, can I still move it?
Yep! All you need is a hosting account. Again we recommend Hostgator or WP Engine. When you sign up for hosting, provide your domain name. The next thing you will need to do is change the nameservers so they point to your new hosting provider. You can contact them if your need help with this or check out this guide.
I hope this tutorial helped you to easily migrate from WordPress.com to your new WordPress.org website. Please let us know if you have any questions!